
GelControl™ Inserts Support
Access protocols, instructional videos, troubleshooting guidance, and technical resources for GelControl™ Inserts.
Downloadable Resources
Download PDF versions of the GelControl™ protocols and application note, or view the detailed protocol online below.
Need additional support? Contact us if you have specific questions about using GelControl™ Inserts in your experiments.
Graphic Protocol for GelControl™ Inserts
Use this visual guide for a quick overview of the GelControl™ seeding workflow. For complete procedures and experimental parameters, refer to the Detailed Protocol in the next section.
If you prefer a PDF version, download the Graphic Protocol.
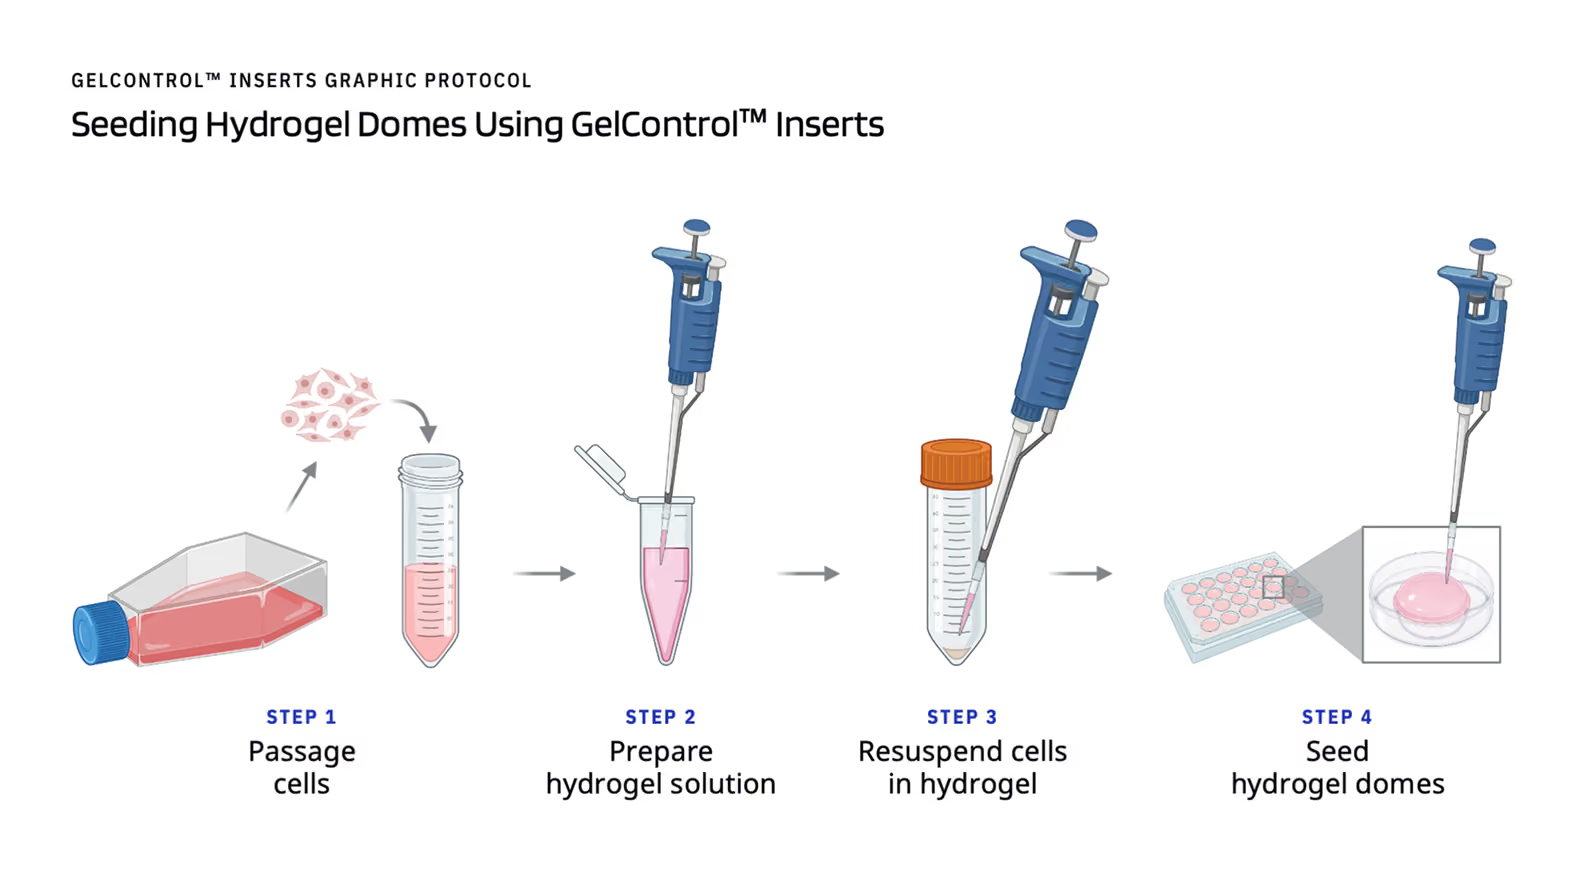
Detailed Protocol for Matrigel Dome Culture with GelControl™ Inserts
Recommended Use
Use this protocol when evaluating GelControl™ inserts for workflows where hydrogel dome position, shape, handling, imaging access, and operator-to-operator consistency are important experimental variables. The protocol is especially relevant for Matrigel dome workflows, organoid or spheroid embedding, stromal co-culture models, interaction assays, and soft hydrogel constructs that are difficult to lift, transfer, or image consistently.
If you prefer a PDF version, download the Detailed Protocol.
1. Workflow Overview
GelControl™ inserts are designed to complement a soft gel ECM by providing a physical support structure for dome formation, culture, fixation, lifting, and transferring. The inserts contain an inner ring that defines the dome area, a thin microfiber grid beneath the hydrogel that enables lifting and transfer, wings that center the gel within the well, and a handle for forceps manipulation (Figure 1). See table 1 for physical specification.
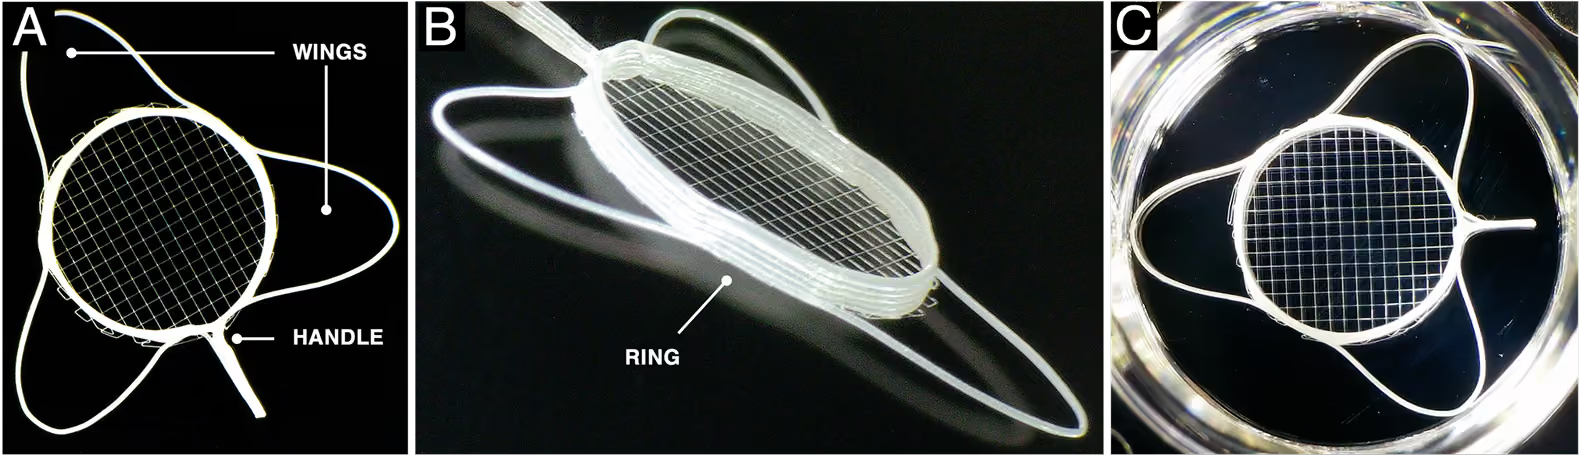
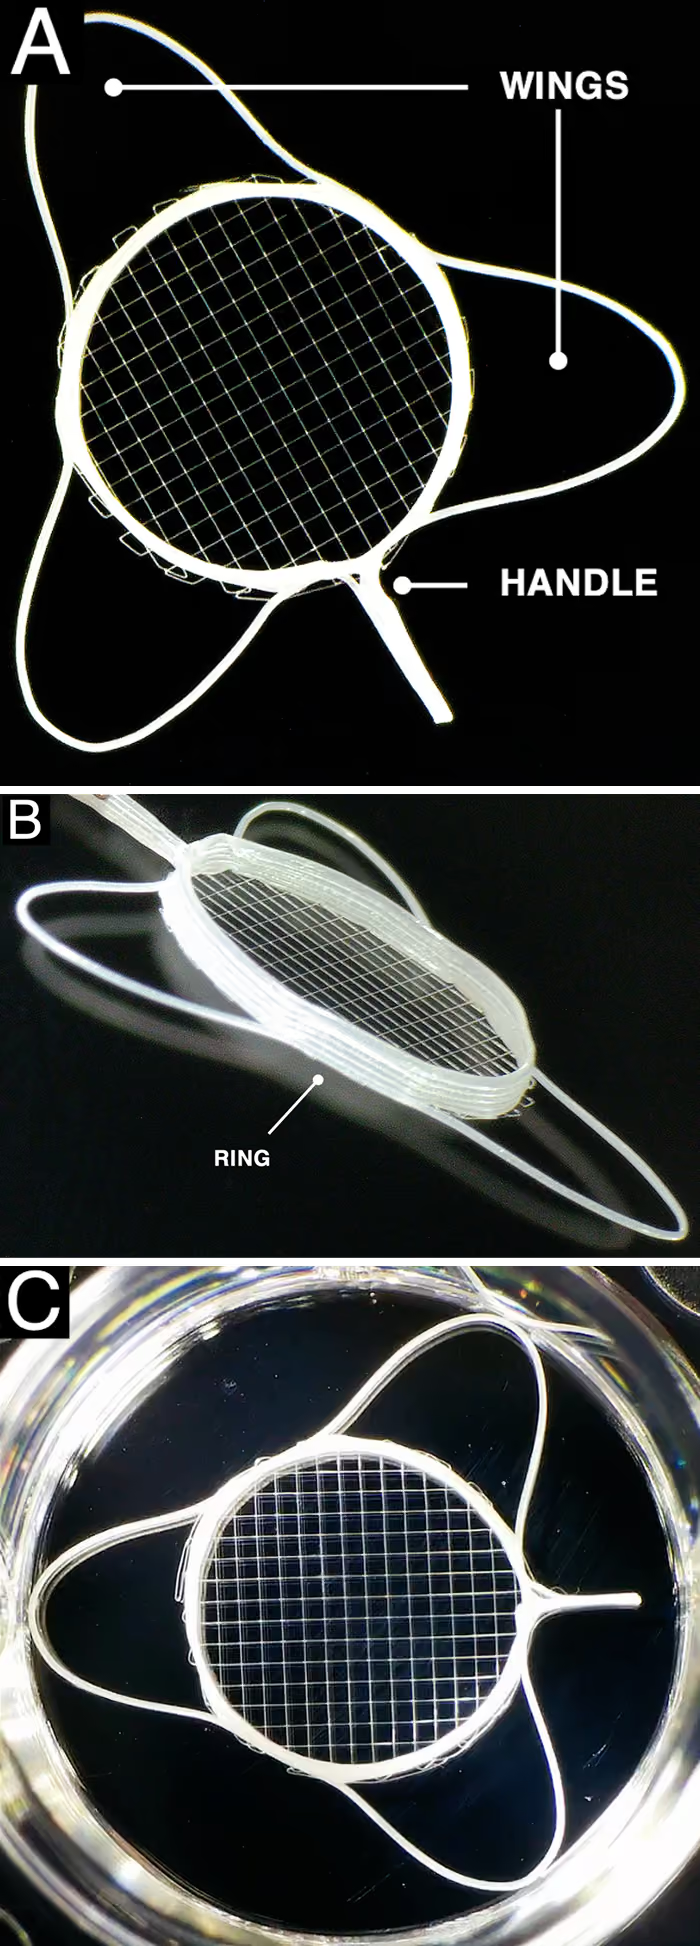
Figure 1: GelControl™ Insert design sized for 24-well plate. A) Top view of inserts highlighting the wing and handle. B) Isometric view of insert highlighting the inner ring portion that molds soft hydrogel shape. C) Top view of insert mounted inside a well plate. The wings press against the walls to keep hydrogel constructs centralized within the well.
| Specification | 24-well | 48-well |
|---|---|---|
| Outer Ring | 16.4 mm | 10.8 mm |
| Ring Diameter | 8.0 mm | 6.5 mm |
| Insert Height | 720 µm | 720 µm |
| Grid Fiber Spacing | 500 µm | 500 µm |
| Grid Fiber Diameter | 14 µm | 14 µm |
workflow steps
Plan Experiment
Choose ECM concentration, cell density, dome volume, culture duration, and endpoints.
Prepare Hydrogel-Cell Suspension
Keep Matrigel, tubes, and tips cold; lift cells, count them, and prepare cell-gel solution to target final concentrations.
Seed dome into insert
Dispense the hydrogel-cell suspension into the inner ring.
Gelation & media addition
Allow gelation before gently adding warm complete medium pipetted against the wall.
Culture & monitor
Perform media exchange and brightfield monitoring.
End culture
Fix, stain, and image intact domes, or perform other endpoint assays.
2. Materials & Equipment
Below are the materials that were used to evaluate GelControl™ inserts in a workflow with Matrigel domes.
materials
GelControl™ inserts
Physical support, shape mold, and central positioning of Matrigel domes. The inserts also enable lifting and transfer of whole intact domes with minimal deformation.
Sterile 24-well plate format compatible with GelControl™ inserts
Use the plate format supplied or specified by VivoTex. Matched control wells should use the same plate type where possible.
Corning® Matrigel® matrix
Prepare final target concentration after accounting for dilution by cells, medium, and additives. Keep cold before dispensing.
NIH 3T3 fibroblasts for example workflow; user-selected organoid or cell model for application work
Use healthy cultures and model-specific passage, viability, and dissociation requirements.
DMEM + 10% FBS + 1% penicillin-streptomycin for NIH 3T3 example
Replace with model-specific complete medium for organoids or primary cells.
Pre-chilled low-retention pipette tips, microcentrifuge tubes, conical tubes, reagent reservoirs, & tube racks
Minimize premature Matrigel gelation and reduce material loss during mixing. model-specific complete medium for organoids or primary cells.
alamarBlue™ Cell Viability Reagent or Equivalent Resazurin-Based Reagent
Measures relative metabolic activity; does not uniquely distinguish proliferation, cell number, apoptosis, necrosis, or metabolic state.
4% paraformaldehyde, PBS, 0.1% Triton X-100, Hoechst, phalloidin
Optional fixed-cell imaging workflow used in the application note.
materials
P200/P1000 pipettes, serological pipettes
Use slow, smooth pipetting to prevent bubbles and shear.
Sterile fine forceps; optional sterile spatula for unsupported controls
Forceps are used to grasp the GelControl™ handle during lifting or transfer.
Inverted brightfield microscope; fluorescence microscope or high-content imager
Use consistent imaging settings and scale bars for supported and control domes.
3. Recommended Starting Parameters
Below are the materials that were used to evaluate GelControl™ inserts in a workflow with Matrigel domes.
| parameter | Starting Values | |
|---|---|---|
| 24-well | 48-well | |
Dome Volume Select a volume that fills the inner ring without overflow | 60-80 µL | 35-45 µL |
Medium Volume Ensure medium covers domes | 1000 µL | 400 µL |
Gelation Time Confirm gelation for each ECM lot and experimental condition | 20 min at 37°C | |
Matrigel Concentrations Optimize for model based on viability and endpoint assays | 3.0–6.0 mg/mL | |
Cell Densities Use cell-type-specific density and viability requirements | 0.1–2.0 × 10⁶ cells/mL |
4. Safety, Sterility, & Biosafety Requirements
This protocol is for research use only and is not intended for diagnostic, therapeutic, or clinical use. Users are responsible for following all institutional biosafety, chemical hygiene, waste-disposal, and training requirements applicable to their cell model, hydrogel, reagents, and assay endpoints.
GelControl™ Inserts
GelControl™ inserts are made of polycaprolactone, a semi-crystalline polyester polymer that is commonly used in the biomedical field for sutures, implants, and in tissue engineering applications (1). Use the inserts only as supplied and according to the intended research-use workflow. Do not resterilize, reuse, modify, or use damaged inserts unless those conditions have been independently validated. When handling GelControl™ inserts, use sterile technique to ensure successful use. Spray package with ethanol before placing inside a clean biosafety cabinet (BSC). Only use sterile tools for handling inserts. Use sterile or autoclaved forceps to minimize introduction of contaminants.
Matrigel
GelControl™ inserts are not supplied with Matrigel or other hydrogels. This protocol provides basic handling guidance for Matrigel as an example ECM hydrogel used with GelControl™ inserts. Please refer to the Matrigel specifications and protocols for more detailed information (2,3). Matrigel is a basement membrane matrix extracted from mouse sarcoma that is rich in extracellular proteins. Handle Matrigel using sterile technique and wearing appropriate PPE in a certified BSC. Maintain sterility of GelControl™ inserts, plates, pipette tips, tubes, media, and forceps throughout setup, seeding, culture maintenance, and transfer.
Mammalian Cell Culture, Organoids, & Other Biological Materials
Follow institutional biosafety requirements for the specific cell type, organoid model, source material, genetic modification status, infectious-agent status, and viral-vector use associated with the experiment. Users should determine the appropriate biosafety level and containment practices before beginning the protocol.Handle all live cultures and culture waste as potentially biohazardous unless the institutional biosafety assessment specifies otherwise. Use appropriate PPE, aseptic technique, approved disinfectants, and validated decontamination procedures for the cell model and facility.
Chemical Reagents
Fixatives, permeabilization reagents, stains, metabolic assay reagents, solvents, and endpoint assay materials may present chemical hazards. Review the relevant safety data sheets and follow institutional chemical hygiene procedures for handling, labeling, storage, exposure control, spill response, and disposal. Paraformaldehyde, Triton X-100, DMSO, fluorescent stains, and other assay reagents should be handled using appropriate PPE and facility-approved chemical controls. Prepare and dispose of chemical and biological waste according to institutional requirements and applicable regulations.
5. Before You Start
Plan the Comparisons with Controls
- When starting to use GelControl™ inserts, compare GelControl™-supported and conventional control domes from the same Matrigel-cell suspension, and keep their experimental conditions as similar as possible. Some common sources of variation include:
- Evaporation and humidity differences in edge wells.
- Well plates from different manufacturers may differ in geometry or surface treatment.
- Pipetting technique — most seeding workflows are time-sensitive, and the order of pipetting affects the spread of results.
- Interlace well positions across the plate to reduce position and timing effects.
- Plan primary endpoints before the experiment.
Prepare Cold Materials (Day Before)
- Thaw Matrigel in 2-8 ºC according to the supplier’s recommendations.
- Perform calculations for Matrigel dilutions, record the required volumes and keep them available in the area by the biosafety cabinet (BSC). To see examples of the calculations refer to the Calculations section.
Prepare Cells or Organoids
- Use cultures with high viability.
- Cells can be either thawed from frozen, or passaged from expansion.
6. Procedure
PROCEDURE STEPS
Prepare GelControl™ Plates & Control Wells
- Bring the GelControl™ plate or insert-containing well plate into the BSC while maintaining sterility.
- Keep the plate closed until immediately before use.
- Prepare matched control wells in the same plate type where possible. Label plate maps clearly to distinguish GelControl™-supported domes from conventional control domes.
- Assemble equipment and materials for Matrigel.
- Pre-chill tubes, pipette tips, and reservoirs that will contact Matrigel.
- Keep Matrigel and Matrigel-containing mixtures cold until the moment of dome dispensing.
- Note: Matrigel will start polymerization if any part of it reaches 10ºC.
Prepare the Cells for Seeding
- Harvest cells or organoids according to the model-specific protocol.
- Count cells or organoid fragments and determine viability.
- Prepare a concentrated suspension that will yield the desired final cell density after mixing with Matrigel.
- Keep the suspension cold (if compatible with the cell model).
Prepare the Matrigel-Cell Mixture
- Prepare volumes recordings of stock Matrigel, cells, diluent, and additives required to reach the desired final matrix concentration and cell density.
- Mix stock Matrigel with diluent gently by pipetting with pre-chilled tips and avoid bubbles.
- Combine cells and Matrigel gently in a chilled tube. Mix until homogeneous without over-pipetting.
- Note: Matrigel viscosity and gelation behavior change as the mixture warms. This may make large experiments with many domes more difficult to seed. Calibrate your containers and cooling equipment to best suit your workflow.
Seed Matrigel Domes
- Using a pre-chilled pipette tip, aspirate the required dome volume. For the 24-well use 60 µL per dome; for 48-well use 40 µL per dome.
- Seed the same Matrigel-cell suspension and the same dome volume for supported domes with GelControl™ inserts and conventional, unsupported, Matrigel domes.
- For accurate evaluation of the effects of the inserts, interlace the seeding order and well position within the same plate to form matched controls.
- Inspect each dome immediately for bubbles, overflow, incomplete filling, or off-center loading. Record any seeding defects.
GelControl™ Inserts
- Position the pipette tip above the inner ring of the GelControl™ insert. Dispense solution slowly into the ring. The solution should fill the defined inner ring.
- To improve pipetting control the pipette tip can be leaned against the top of the wall edge. Watch demonstration video below.
- Avoid touching the microfiber grid with the pipette tip. Do not scrape or push against the grid. Watch demonstration video below.
Conventional Matrigel Domes
- Dispense Matrigel domes directly into matched wells.
- Use consistent pipetting angle, dispense speed, and well location across controls.
Gel the Domes
- Transfer the plate carefully to a humidified 37 °C incubator.
- Allow domes to gel undisturbed for 20 minutes before media addition.
- Some protocols advise turning Matrigel dome upside down for gelation to discourage cell attachment to the tissue culture plastic. GelControl™ inserts are compatible with this optional step, and reliably remain on the bottom of wells.
- Do not add medium until domes are visibly gelled.
Add Complete Culture Medium
- Warm complete medium to 37°C (or appropriate temperature for the cell model).
- Gently add medium along the wall of each well, away from the dome. For the 24-well, add 1000 µL per well; for 48-well add 400 µL.
- Handle plates with domes carefully between an incubator and a BSC. The domes are highly fragile and can easily detach. Avoid abrupt plate movement.
- Avoid dispensing directly onto the gel surface.
- Return the plate to the incubator.
Culture Maintenance & Media Exchange
- Monitor cultures by brightfield imaging or visual inspection according to the experimental schedule.
- During media exchange, aspirate and dispense along the well wall. Keep the tip away from the gel construct and microfiber grid.
- GelControl™ inserts allow near 100% media exchange without disturbing the domes. Tip plates and position aspirator next to the wall. Aspirate the desired amount of liquid with while reducing the risk of aspirating or damaging the cultures.
- For media exchange of unsupported domes, be extra vigilant. Aspirate media slowly, and ensure the domes are disturbed as little as possible.
- Document dome position, deformation, detachment, floating, contraction, and any observations during each exchange.
Brightfield Imaging During Culture
- Monitor your cells during culture using brightfield images.
- Acquire low-magnification images to document construct position and shape, and higher-magnification images to monitor cellular phenotype.
- Image supported and conventional cultures with similar settings. The GelControl™ microfiber grid will be visible in the images.
Lifting & Transfer
Watch demonstration video below.
- Use autoclaved forceps to grasp the GelControl™ handle, not the gel or the microfiber grid.
- Lift slowly to allow excess medium to drain back into the well. Avoid rapid acceleration or contact with the well wall.
- Transfer the insert-supported construct into a fresh well, staining vessel, imaging dish, or processing container containing appropriate medium or buffer.
- After transfer, confirm that the construct remains attached to the insert and centrally positioned. Record any deformation or gel loss.
alamarBlue Metabolic Activity Assay
- Prepare alamarBlue working solution according to the reagent manufacturer’s protocol and the validated plate-reader settings in your laboratory.
- Remove or dilute culture medium as required by the assay plan, then add assay solution gently along the well wall. Use 300 µL alamarBlue solution per well in a 24-well format and 1 hour incubation.
- Include controls containing a clear medium and alamarBlue solution that was incubated without cells.
- Read fluorescence or absorbance within the linear range of the assay. Normalize within the experiment using appropriate controls.
Fixation & Fluorescence Imaging
- Fix constructs using 4% paraformaldehyde for 30 minutes.
- Wash gently with PBS. Add and remove liquids along the wall of the well or transfer vessel.
- Permeabilize constructs using 0.1% Triton X-100 for 30 minutes at room temperature.
- Stain with antibodies according to the manufacturer’s recommendations.
- Counterstain with Hoechst (2000X) or DAPI and phalloidin for 1 hour at room temperature.
- Image domes using consistent objective, and processing settings. Note that the microfiber grid may appear in transmitted-light or fluorescence images. When using laser scanning confocal microscope, the grid can be avoided with the desired focal area.
Experimental Design Recommendations
For first-time evaluation, compare GelControl™-supported domes against conventional unsupported domes using the same cells, matrix lot, matrix concentration, dome volume, medium, timepoints, and endpoint assays. The application-note study evaluated two common variables independently: Matrigel concentration and initial cell density.
RECOMMENDATIONS
Include conventional unsupported domes prepared with the same Matrigel-cell suspension and volume.
Use enough biological and technical replicates to quantify variability.
Start with a reference established concentration; add lower and higher concentrations.
Start with a reference density; add lower, and higher density groups.
Use functional readouts specific to the target cell/tissue properties.
Report mean ± SD and coefficient of variation, and use a pre-defined test for group comparisons.
Workflow Tips & Common Pitfalls
troubleshooting guide
The last several domes seeded are not gelling.
Gel domes are not visible after addition of media.
Bubbles in dome.
Gel does not fully fill inner ring.
Microfiber grid visible in images.
Microfiber grid deformed substantially.
Calculations for Matrix Concentration & Cell Density
Use the equations below to prepare the final Matrigel-cell suspension. Always account for the dilution introduced by cells, medium, drugs, growth factors, or other additives. Prepare slightly more solution than required. Pipetting of the last bit of viscous solutions typically results in bubbles and the most temperature fluctuation.
| output | equation |
|---|---|
| Final Solution Volume | (# of constructs × volume/construct) + overage |
| Volume of Matrigel Stock | (Final concentration * final solution volume)/(Matrigel stock concentration) |
| Diluent Volume | Final solution volume – volume of Matrigel stock |
| Total Cells Needed | Cell density * final solution volume |
Hydrogel Preparation Calculator
Enter your target values and experiment setup to calculate the required Matrigel stock volume, diluent volume, final solution volume, and total cells needed.
References & Resources
- Malikmammadov E, Tanir TE, Kiziltay A, Hasirci V, Hasirci N. PCL and PCL-based materials in biomedical applications. J Biomater Sci Polym Ed. 2018;29(7–9):863–93. doi:10.1080/09205063.2017.1394711 PubMed PMID: 29053081. Available from: https://pubmed.ncbi.nlm.nih.gov/29053081/
- Corning Incorporated. Guidelines for Use - Corning Matrigel [Internet]. Corning; [cited 2026 Jul 6]. Available from: https://www.corning.com/catalog/cls/documents/protocols/Matrigel_Matrix_Organoid_Culture_Guidelines_for_Use.pdf
- Corning Incorporated. Considerations When Optimizing Corning® Matrigel® Matrix Dome Culture [Internet]. Corning; 2025 Sep [cited 2026 Jul 6]. Report CLS-AN-873. Available from: https://www.corning.com/catalog/cls/documents/application-notes/CLS-AN-873.pdf
- VivoTex. GelControl™ Inserts for Hydrogel Dome Workflows. Application-note.
- Thermo Fisher Scientific. alamarBlue™ Cell Viability Reagent protocols and user guide.
- MilliporeSigma. Organoid Culture Frequently Asked Questions.